

How to learn basic lock picking with safe online tutorials
Start with a simple practice lock, use a tension wrench to apply light rotational pressure, and learn to set one pin at a time. The best online lockpicking tutorials explain when to use a hook for individual pins and when to try a rake for broader feedback. Practice only on locks you own or have clear permission to pick.
The tools and terminology may feel unfamiliar at first. Focus on how each pick feels against the pins, and adjust your technique rather than forcing the lock. This guide explains how to choose beginner-friendly tutorials, build a safe practice routine, and understand the roles of hooks, rakes, and tension tools. You’ll also learn how to develop skills step by step, avoid common practice mistakes, and follow the ethical standards that make locksport a rewarding hobby.
Key Takeaways
- Begin with a simple practice lock and learn to set one pin at a time before moving to more complex challenges.
- Choose a dedicated training lock for repeatable practice, then use other practice locks to experience different feedback.
- Use light, controlled tension and reset the lock if a short rake attempt doesn’t work.
- Match your pick to the task: hooks help with individual pins, while rakes can help you explore the pin stack.
- Practice only on locks you own or have permission to pick, and stop if a lock feels damaged or stuck.
Frequently asked questions about learning lock picking
- Which free lockpicking tutorials are recommended for beginners? Choose free lessons that demonstrate standard pin-tumbler locks, show tool movements clearly, and explain tension alongside picking. Start with a simple practice lock and a lesson on setting one pin at a time. Pause after each step and compare what you see with the feedback you feel.
- How do popular tutorials compare for clarity, skill level, and format? Close-up videos make hand movements easier to follow, while written guides are useful for reviewing terms and steps. Beginner lessons should explain tension and pin feedback before introducing security pins. More advanced modules can build on that foundation through guided practice and progressively harder locks.
- Are lock-picking tools legal to own and use? Rules vary across the United States, so don’t assume one rule applies everywhere. Use locks you own or have clear permission to pick, and never test techniques on locks securing property or access you don’t control.
- What should a beginner starter set include? A basic set can start with three picks, a rake, and one tension tool. Hooks help you work individual pins; rakes move across multiple pins. Pick a small set that lets you identify each tool’s purpose, rather than adding unfamiliar shapes before you understand the basics.
- How should a progressive course build skills? Follow lessons in sequence: learn lock parts and tool handling, practice tension, set one pin at a time, then compare single-pin picking with raking. Repeat the process on another practice lock. Move to more challenging examples only when you can describe the feedback guiding each adjustment.
- How do standard pins respond to picking and tension? A tension wrench applies rotational force to the plug while a pick contacts the pins. Start with light pressure, feel for a pin that resists movement, and lift it gently. If the plug turns slightly, reassess the remaining pins. If the feedback becomes unclear, release tension and reset.
- How long does basic learning take? Many beginners can open a clear practice lock within 15 to 30 minutes, though that first success doesn’t equal consistent skill. Regular practice may help a beginner open a basic real-world pin tumbler within one to two weeks. Track what you feel, not just whether the lock opens.
Safe practice and possible lock damage
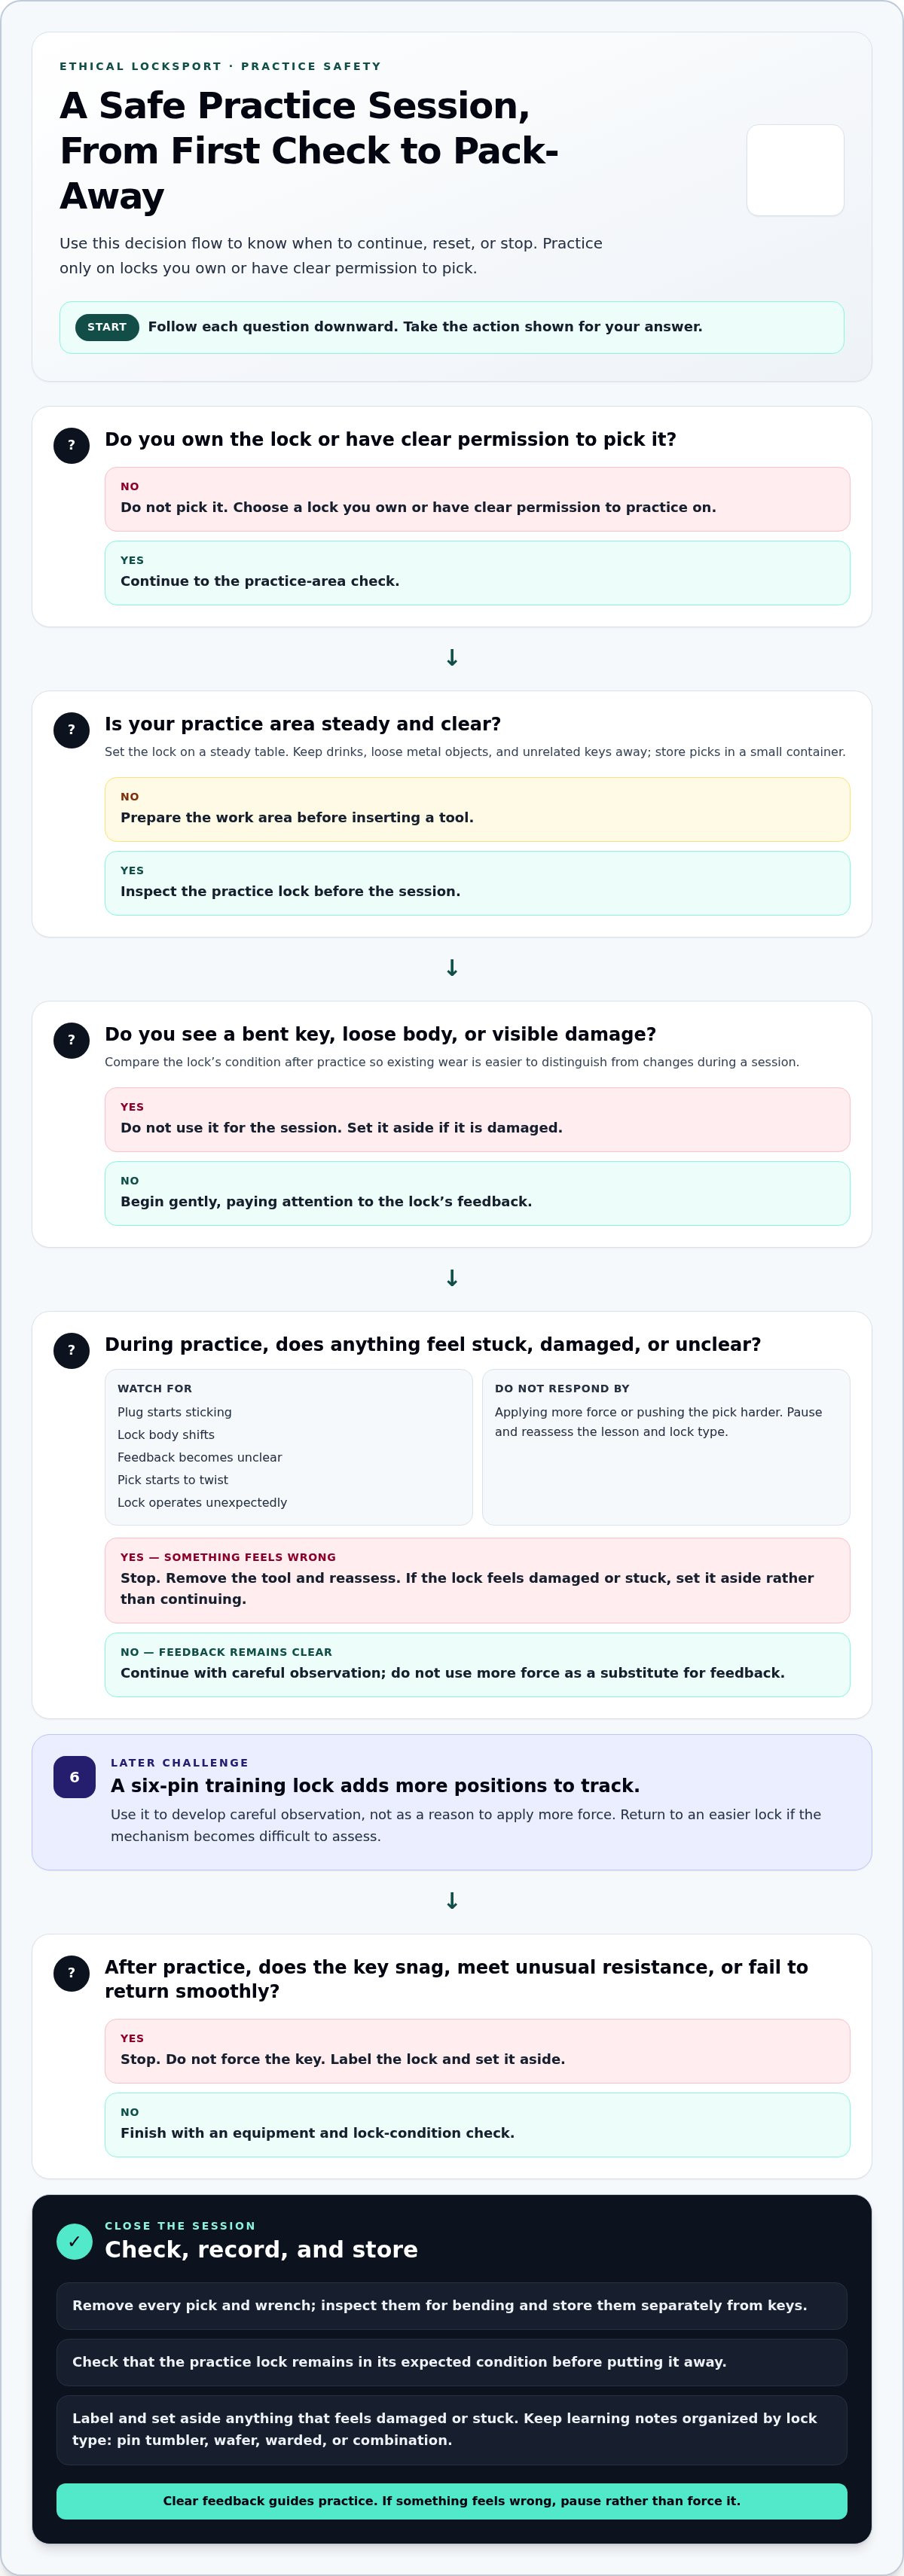
- Set up a dedicated practice area. Place the practice lock on a steady table with clear space around it. Keep drinks, loose metal objects, and unrelated keys away from the work area. Store picks in a small container so they don’t fall onto the floor or get mistaken for household keys.
- Inspect the lock before each session. Check for a bent key, loose body, or visible damage before inserting a tool. Compare the lock’s condition after practice. If the plug starts sticking or the body shifts, stop using it. Continuing could make it harder to distinguish existing wear from damage caused during practice.
- Choose a six-pin training lock as a later challenge. Its additional pin positions create more points to track than a simpler practice model. Use it to develop careful observation, not as a reason to apply more force. Keep a brief record of any unusual feedback, and return to an easier lock if the mechanism becomes difficult to assess.
- Keep picking and disassembly as separate activities. Study internal parts only with a lock designed for repeated disassembly. Set aside a clean surface, keep small components away from table edges, and don’t pry the shell open. Parts that jump or bend can be difficult to identify and may prevent correct reassembly.
- Notice changes in key operation after practice. Gently test the key before and after a session on a practice lock. Stop if it snags, meets unusual resistance, or fails to return smoothly. Don’t force the key to check whether the mechanism still works; doing so could worsen a developing problem.
- Separate lock types in your learning notes. Label each practice lock by mechanism, such as pin tumbler, wafer, warded, or combination. This helps you avoid applying a lesson for one design to another. For example, a pin-tumbler demonstration won’t explain how a combination lock’s numbered wheels work.
- Handle security features with patience. Security pins can produce feedback that feels different from standard pins. Don’t respond by increasing pressure or pushing the pick harder. Pause, remove the tool, and reassess the lesson and lock type. Stop if a pick starts to twist or the lock operates unexpectedly.
- Close each session with an equipment check. Remove every pick and wrench, inspect them for bending, and store them separately from keys. Check that the practice lock remains in its expected condition before putting it away. If anything feels damaged or stuck, label it and set it aside rather than using it again.
Basic raking and tensioning
- Choose a wrench position that leaves room for the pick. Depending on its shape and the lock’s opening, a tension wrench may sit at the top or bottom of a keyway. Test its position on a practice lock before inserting the rake. The wrench should stay seated without blocking the rake or forcing your hand into an awkward angle.
- Learn the feel of tension before adding a rake. With the lock in its normal state, place the wrench and apply slight rotational force. Notice how the plug resists and how the wrench feels against your fingers. Release, reposition, and compare. This quick check helps you notice when your grip becomes tighter than intended.
- Keep your hands relaxed and supported. Rest your forearms on the table so they don’t carry your arms’ full weight. Hold the wrench between your fingertips instead of squeezing it in your palm. A relaxed position makes small changes easier to notice and reduces accidental shifts as the rake moves.
- Move the rake in a controlled, repeatable path. Guide it along the keyway without repeatedly scraping the top or bottom. Use a smooth in-and-out motion and keep it consistent across attempts. A shorter, steady stroke can make feedback easier to interpret than a fast sweep that contacts several surfaces at once.
- Change only one part of your approach at a time. If the first attempt gives little feedback, keep the wrench position and hand posture steady while changing the rake’s depth. On the next attempt, hold the depth steady and adjust your grip slightly. Recording each change helps show which adjustment affected the plug’s response.
- Use sound as a clue, not your only guide. A click may come from tool contact rather than a pin setting. Consider the sound alongside the feel of the wrench and plug. If the sound changes but the plug’s behavior doesn’t, pause and adjust the rake’s path instead of repeating the same stroke with more force.
- Set a clear stopping point for each attempt. If raking has not opened the practice lock after 10-20 seconds, release tension and reset it. Restart with a fresh grip rather than continuing the same motion. This keeps practice structured and makes it easier to compare attempts without adding force or speed.
- Finish by noting the setup that gave the clearest feedback. Record the wrench position, rake profile, and hand placement that felt easiest to control. Note whether the lock responded differently after an adjustment. These details give your next session a specific starting point instead of relying on memory or changing several things at once.
Dedicated training locks versus multiple locks
- Use one dedicated lock to establish a baseline. A familiar training lock lets you compare sessions without introducing a new mechanism each time. Record its type, how the key operates, and any noticeable changes in feedback. Keep the key and lock together, and reserve the lock for learning rather than household security. A consistent starting point makes later comparisons more meaningful.
- Add another lock when you can explain the difference. Choose a second practice lock with a distinct keyway or mechanism, then note what feels different. Change one feature at a time where possible. If you switch locks and picks at the same time, it becomes harder to tell whether the feedback changed because of the tool, your technique, or the lock.
- Arrange practice locks by difficulty, not appearance. A clear training lock can help you observe internal movement, while an opaque one asks you to rely more on tactile feedback. Security features add another layer to interpret. Treat these as different learning stages, and return to a familiar example whenever a new lock’s feedback is hard to read.
- Separate pin-tumbler practice from other mechanisms. A wafer lock uses flat plates rather than pin stacks; a warded lock relies on internal obstructions, and a combination lock uses a sequence of settings. Each needs its own learning material. Label practice locks by mechanism so you don’t mistake a lesson about one design for guidance on another.
- Assess re-pinnable locks for repeat use. A lock made for re-pinning lets you change practice configurations without replacing the training lock. Before choosing one, consider whether it allows straightforward disassembly and whether you can keep its small parts organized. Follow the maker’s instructions, and disassemble only locks intended for that purpose.
- Use a practice log to compare progress across locks. Record the lock type, lesson or concept practiced, and feedback that stood out. Note if the key starts behaving differently or the lock no longer operates as expected. These observations help distinguish a technique challenge from a change in the practice lock’s condition.
- Use community rankings to choose a suitable next challenge. Locksport belt rankings group practice locks by difficulty and help track skill progression. Choose a lock that matches your current level, then discuss its general classification with other hobbyists. Keep those discussions focused on authorized practice, and never test a technique on a lock without permission.
Using different picks
- Learn each tool’s role before comparing its feel. Standard pin-tumbler practice uses rakes, hooks, and a tension wrench. Rakes contact multiple pins; hooks let you focus on individual pin feedback. The wrench applies rotational force to the plug. Keep these roles clear when choosing a beginner lesson or reviewing its demonstrations.
- Compare pick profiles on a practice lock. A hook’s curved tip and a rake’s shaped edge create different sensations. Use a lock reserved for locksport, and follow a tutorial that identifies the pick shown. Don’t assume similarly named tools have identical profiles; compare their shapes and the lesson’s stated purpose.
- Track tactile feedback, not just visible movement. A close-up video may show a pick entering the keyway, but your fingers feel resistance and movement. Notice whether feedback changes with the tool profile. Keep tension consistent while comparing picks so you can tell which change came from the pick rather than your grip.
- Use one variable at a time. Start a session with a familiar hook, then compare a rake in a separate attempt. Keep the lock, hand position, and tension approach consistent. A simple log can record the pick shape, tutorial lesson, and feedback. This makes the comparison useful rather than random.
- Choose tutorials that name the pick clearly. A strong beginner lesson labels a hook or rake onscreen and explains its general role. Pause when the instructor changes tools. Check that the demonstration still uses a standard pin-tumbler practice lock, not a wafer lock or another mechanism.
- Recognize when a specialty pick is involved. Dimple picks are for dimple locks, a different format from standard pin-tumbler locks. Treat a tutorial using them as a separate topic, not a required next step for every beginner. Match the tool to the mechanism shown and practice only on authorized locks.
- Stop if a pick catches or bends. A thin pick that twists or bows may be experiencing pick warp. Don’t force it deeper or apply extra pressure to compensate. Remove the tool, reset the practice lock, and review the lesson’s pick profile before continuing.
- Build a small comparison routine. Choose one practice lock, review a lesson, and identify its pick before handling tools. Compare hook and rake feedback in separate attempts, then record what felt different. For a standard pin-tumbler pick set, compare the Carbon Fiber Gen 2 Pro Series with the shapes demonstrated in your lessons.
Lockpick Pros: Beginner Lockpick Sets
Lockpick Pros offers Beginner Lockpick Sets for readers ready to pair online lessons with hands-on locksport practice. Use a beginner set to follow demonstrations, compare pick shapes, and develop a feel for tension on a practice lock you own or have permission to pick.
Choose Practice Locks to repeat a lesson without involving a lock used for security. As your technique develops, Advanced Lockpick Sets and Everyday Carry (EDC) Tools can support different stages of your hobby. Start with tools and a practice setup suited to your current learning goals, then build your skills step by step.
Visit lockpickpros.com to explore beginner tools and practice options.
Make Your Next Practice Session Count
Turn a tutorial into a repeatable learning routine. Choose one lesson, set a clear goal, and note what you want to understand better next time. For example, identify the tool demonstrated or notice how a technique change affects feedback. This keeps each session focused and gives your learning direction beyond simply trying to open a lock.
The best online lockpicking tutorials can guide your progress, while practice notes help connect demonstrations with what you feel. Keep locksport ethical by working only on locks you own or have permission to pick. As your interests develop, choose tools suited to the skills you want to practice next.
For a set to support continued practice, explore the Carbon Fiber Gen 2 Pro Series. Keep learning, stay patient, and enjoy the challenge.
Frequently Asked Questions
What are the best beginner online lockpicking tutorials for legal hobbyists?
The best online lockpicking tutorials for beginners identify the lock type, show tools clearly, and explain ethical practice. Look for lessons that distinguish standard pin-tumbler locks from other mechanisms and demonstrate techniques only on practice locks. A structured video series gives you a visual reference to revisit. Every Lockpick Pros purchase includes access to the Lockpicking Bootcamp video series. Practice only on locks you own or have permission to pick.
What do beginner lockpicking courses cover, and how are they structured?
Beginner courses usually introduce lock parts, tool names, and basic handling before demonstrating techniques. The best online lockpicking tutorials organize lessons by skill, with each module building on concepts already introduced. Make a course easier to follow by noting unfamiliar terms, pausing demonstrations, and reviewing sections before practice. Videos provide visual context, while brief notes help you track what you’ve studied.
How much do online lockpicking courses and beginner practice kits cost?
Prices vary by course format and kit contents. That price refers to the named pick set, not an average course or practice-lock cost. Compare the tools and learning materials included in each option, then choose a setup that suits your learning goals.
What tools do beginners need to follow online lockpicking tutorials?
Choose tools that match the lock and technique shown in each lesson. For standard pin-tumbler tutorials, a beginner commonly uses a hook, a rake, and a tension wrench. A practice lock provides a dedicated place to follow the demonstration. Before starting, identify the tool profile shown onscreen and arrange your tools nearby. That simple setup makes it easier to follow the instructor without interrupting practice to search for a pick.
Where is lockpicking legal, and what restrictions apply to practice locks?
Lockpicking tools are legal in most areas when they aren’t used for illegal purposes, but rules vary by location. Learn the applicable local requirements before traveling with tools or practicing in a shared space. Choose a lock you own or have clear permission to pick. Keep practice locks separate from locks securing someone else’s property, vehicle, or access.
What safety and ethical rules should hobbyist lockpickers follow?
Practice locksport only on locks you own or have explicit permission to use. Don’t test a technique on a lock just because it’s accessible. Store picks securely, especially around children, and follow the tutorial’s guidance for the lock type shown. If you share progress online, film a dedicated practice lock and avoid showing a door, vehicle, or other identifiable security point in the background.
What are common risks of learning lockpicking from online tutorials?
A video may hide small movements or show a different mechanism from your practice lock. That mismatch can cause confusion, excess force, or damage to a lock or pick. Choose lessons that identify the lock type and tools, and pause when a step isn’t clear. Stop if a pick bends or catches. Use tutorials only for authorized practice, never on locks you don’t have permission to pick.