

How to avoid breaking lock picks
Force is the quickest way to turn a stubborn pin into a damaged pick. To learn how to avoid breaking lock picks, apply light, steady tension, use small controlled movements, and stop if the pick binds or flexes. A pick that bends can lose strength even if you straighten it, so don’t keep working with a damaged tool.
It’s frustrating when a lock doesn’t respond, but pushing harder makes tactile feedback harder to read. A binding pin often feels more resistant than the others. Clicks and shifts can help you tell whether a pin has set or needs more careful manipulation.
This guide explains how to spot possible pick defects, adjust tension, choose a suitable pick, and prevent accidental bends when handling or storing your tools. Patient practice on locks you’re authorized to pick helps build control and protect your equipment as your locksport skills grow.
Key Takeaways
- If a pin resists, pause and change your approach or pick instead of forcing it.
- Inspect picks for irregular edges, twists, or bends before practice, and set aside any tool that appears damaged.
- Use the binding pin and the movement of the other pins to guide how much tension the lock needs.
- Keep picks for picking, and store them in a case when they’re not in use to reduce accidental damage.
- Choose a pick material and thickness that suit the keyway, since thinner picks need careful handling.
1. Avoiding excessive force to protect tools and locks
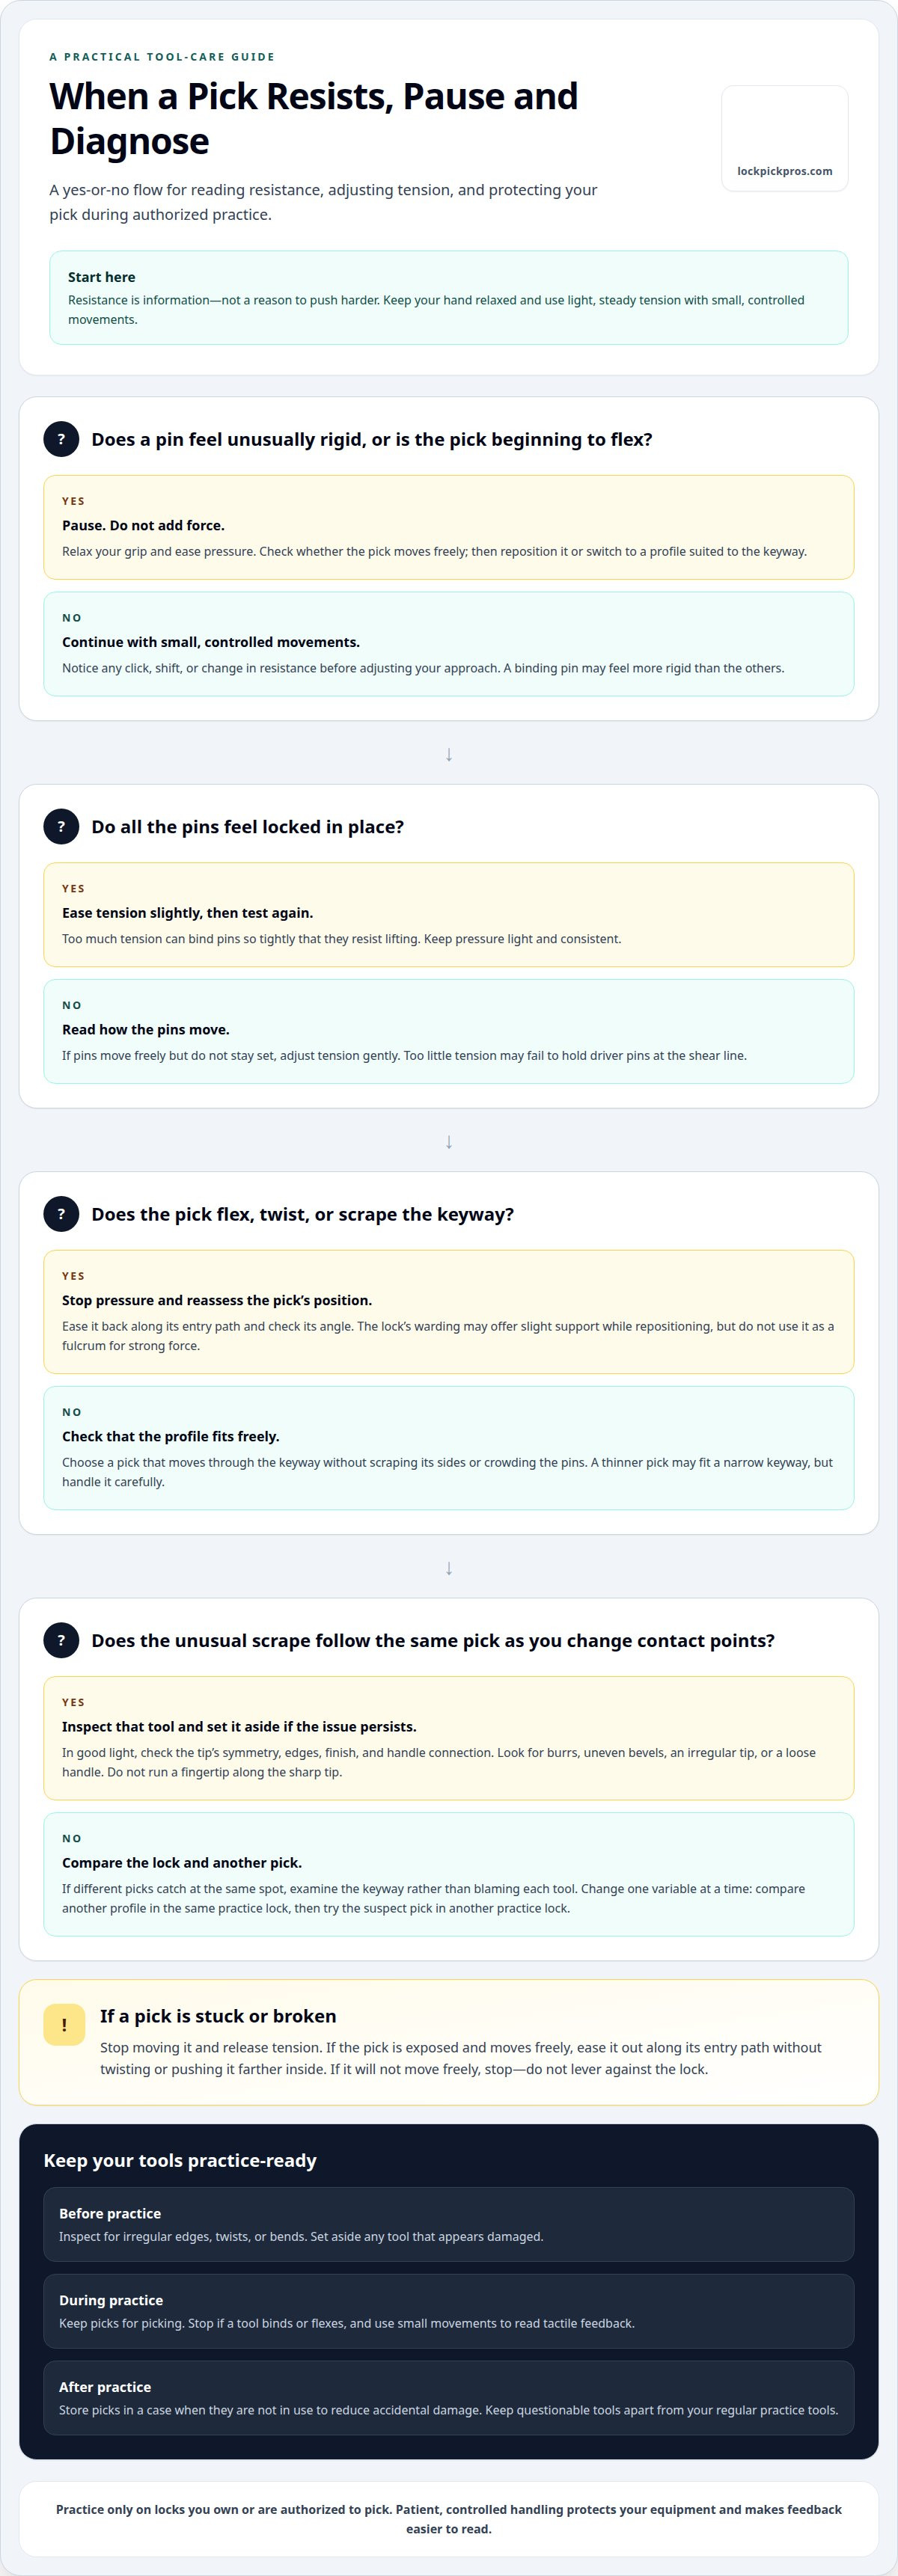
When a pin resists, pushing harder can bend a pick and may damage the lock. Treat resistance as information. A binding pin often feels more rigid than the others, while nonbinding pins may lift more easily. Test each pin with a small movement, then pause to notice any click, shift, or change in resistance. These sensations help you decide whether to continue or adjust your approach.
Keep your hand relaxed and use short, controlled strokes. If the shaft flexes, twists, or scrapes the keyway, stop applying pressure. Ease the pick back along its entry path and reassess its angle. The lock’s warding may provide slight support as you reposition a pin, but don’t use it as a fulcrum for strong leverage. Heavy pressure can strain both the pick and the lock.
If a pin remains stubborn, switch tools instead of forcing it. A hook allows controlled contact with an individual pin; a rake supports a different picking technique. Match the profile to the lock and keyway. For example, specialized dimple pick profiles suit dimple locks, not standard pin-tumbler locks. A different profile can give you room to move without scraping or wedging.
- Pause at resistance. Stop if a pin feels unusually rigid or the pick begins to flex.
- Relax your grip. Ease pressure and check whether the pick moves freely.
- Reposition or switch tools. Withdraw gently, then choose a profile suited to the keyway.
- Resume with small movements. Notice changes in feel before applying more pressure.
How do you choose the right pick size for a lock? Choose a profile that moves freely through the keyway without scraping its sides or crowding the pins. A thinner pick may fit a narrow keyway, but it still needs enough room to move without catching.
How do you safely remove a stuck or broken lock pick? Stop moving it and release tension. If the pick is exposed, ease it out along its entry path without twisting or pushing it farther inside. If it won’t move freely, stop rather than levering against the lock.
Practice these steps on a lock you own or are authorized to pick. If the same pin keeps resisting, change one factor at a time: adjust the pick’s angle, try another profile, or pause before trying again. This helps distinguish a tool mismatch from resistance in the lock. Patient, controlled movements protect your equipment and make tactile feedback easier to read.
Excessive force can bend or break tools and may damage the lock. Use the lock’s warding only for slight support when shifting a stubborn pin, not for strong leverage.
2. Recognizing possible manufacturing defects
Before a practice session, inspect a new pick in good light. Check the tip’s symmetry, the transition from tip to shaft, and the handle connection. A jagged edge, uneven bevel, or abrupt change in width can interfere with smooth movement. Compare matching profiles side by side. If one has a visibly different tip shape or finish, set it aside for closer inspection rather than testing it under pressure.
Wipe away residue with a clean cloth, then examine the pick from both sides. A burr may snag fabric or leave a rough spot along an edge. Don’t run a fingertip along the sharp tip. Instead, lightly pass cloth over the shaft and check whether it catches. Hold the shaft steady and gently test the handle for movement. A loose connection can make feedback feel inconsistent.
Clicks and shifts are useful, but they don’t automatically indicate a defect. A click may come from a moving pin, while a shift can reflect a change in the plug or pin position. Notice whether the sensation repeats in the same way. If an unusual scrape follows one pick as you change contact points, inspect that tool. If the sensation occurs only at one spot in the lock, the warding or pin movement may explain it.
- Inspect the finish: Look for burrs, uneven edges, or an irregular tip shape.
- Check the handle: Gently test for movement between the handle and shaft.
- Compare sensations: Notice whether a click or scrape follows the pick or occurs at one lock position.
- Keep a note: Record the profile and the symptom, such as “rough edge near tip” or “handle shifts.”
Change one variable at a time to find the source. Try a different pick profile in the same practice lock, then test the suspect pick in another practice lock. If the catch follows the suspect pick, stop using it until you’ve inspected it again. If different picks catch at the same point, examine the lock’s keyway rather than blaming each tool. This comparison helps distinguish a tool irregularity from normal contact with the lock.
Keep any questionable pick apart from your regular tools, so it doesn’t return to the practice rotation unnoticed. For standard pin-tumbler practice, a selection of pick profiles can help you compare how different shapes feel in a keyway. Choose a profile that moves smoothly, and set aside tools with persistent roughness or an unstable handle. Recording the issue also makes it easier to notice whether it changes after storage or handling.
3. Applying appropriate tension
A tension wrench applies rotational force to the plug while you work the pins. Use light, consistent pressure rather than a hard twist. Too much tension can bind pins so tightly that they resist lifting. Too little may fail to hold driver pins at the shear line. Start gently and adjust based on what you feel. Learning how to avoid breaking lock picks includes keeping wrench pressure separate from pick movement.
Use the binding pin as your guide. With steady, light tension, test the pins with a pick. One pin may feel more rigid, while the others lift with less resistance. That contrast helps show whether your tension is suitable. If every pin feels locked in place, ease the pressure slightly and test again. If pins move freely but don’t stay set, apply a little more pressure.
Make one adjustment at a time. If a pin won’t lift, for example, don’t increase tension and push harder at once. First, reduce pressure on the wrench, then gently test the pin again. Notice whether its movement changes. If it lifts more easily, the previous tension was likely too strong. If it moves freely but drops back, gradually restore light pressure and notice any click or shift. This measured process helps you avoid breaking lock picks while building reliable control.
- Set a light starting point: Hold the wrench so it applies gentle rotational pressure without straining your fingers.
- Check each pin: Use the pick to compare resistance across the pin stack.
- Adjust gradually: Ease or increase pressure in small changes, then test the same pin again.
- Read the feedback: A click or shift may indicate a pin’s position changed; confirm through touch rather than sound alone.
Avoid sudden changes during a picking attempt. If you release all tension abruptly, pins that had started to set may fall back. If you twist the wrench harder after a pin resists, the pick may strain against a trapped pin. Keep your grip relaxed enough to make small adjustments, and pause if you can’t tell whether resistance comes from the pin or the pick’s angle.
On a familiar practice lock, repeat the same gentle sequence and observe how the binding pin responds. The useful tension is enough to reveal one binding pin while allowing the others to lift easily. The right amount varies by lock, so don’t assume the same pressure suits every keyway. A properly sized tension wrench should sit securely without blocking the pick’s path. Steady pressure and careful attention to feedback make practice more controlled.
4. Avoiding accidental bends and breaks
Pick damage can happen between practice attempts, not just inside a lock. Before moving your setup, remove every tool from the keyway and place it flat on a clear surface. A pick left protruding can catch on a sleeve, notebook, or table edge. The sideways tug can bend the shaft before you notice. Build a simple end-of-session routine: withdraw each tool, inspect it, then put it away.
Use picks only to manipulate pins. They aren’t designed to turn plugs or serve as bypass tools, and using them that way puts force across a narrow shaft. Use a tension wrench for rotational force. If a task requires a different tool, choose one made for that purpose rather than improvising with a pick. Keeping each tool to its intended role reduces strain and helps preserve its shape.
A bend can compromise a pick’s strength even after it’s straightened. Don’t try to restore a warped pick by flexing it back and forth. Set it aside and compare its outline with an undamaged pick of the same profile. Look along the shaft toward the tip and check whether it sits straight. If its shape differs, remove it from your practice rotation rather than relying on it again.
- Before packing up: Remove picks from locks and place them on a clear surface.
- While practicing: Keep unused tools away from the lock and avoid resting objects on their handles.
- After use: Inspect the shafts, separate any bent picks, and store the rest in a case.
- For transport: Secure picks so they can’t slide beneath heavier objects or catch on loose items.
A case protects tools from bumps and pressure during storage and transport. Don’t leave picks loose in a drawer, pocket, or bag where heavier items can press against them. Arrange them so you can see each profile and spot any missing or displaced tool. If a pick sticks out of its case, reposition it before carrying the case. The closed cover should not press against the tip.
A locksport author reported going more than a decade without breaking a pick, then snapping two. The practical lesson is that careful habits reduce risk, but a sudden break still calls for a pause. Check how the pick was stored or handled, then adjust that routine before continuing. Consistent care helps keep your tools ready for focused practice and preserves the tactile feedback you rely on as your skills develop.
5. What lock pick materials and thicknesses are least likely to break?
Material and thickness both affect how a pick responds inside a lock. High-yield stainless steel is a stainless alloy, often 301, with high tensile and yield strength. It’s used to make thin, durable picks, but strong material cannot prevent damage from excessive force or poor handling. Choose a pick for the keyway and task, then use controlled movements.
Some picks are made in slim gauges as small as 0.018 inches. A thin profile can fit a narrow keyway, where a thicker pick may rub against the warding or have limited room to move. Thin stock also flexes more readily, so it calls for careful handling. A thicker pick may feel stiffer, but it can scrape or bind if the keyway is too tight.
There isn’t one thickness that suits every lock. Match the pick profile to the available space. If a pick’s shaft drags along both sides of a narrow keyway, for example, try a thinner profile rather than forcing it through. If a very thin pick bends during gentle movement, inspect it for damage and consider whether the lock needs a sturdier profile.
- Check keyway clearance: The pick should move without wedging against the sides.
- Consider the task: Single-pin manipulation and working in a tight keyway may call for different profiles.
- Notice flex: Some flex can occur with thin stock, but visible bending or twisting means stop and inspect.
- Compare like with like: Look at the same pick shape in different thicknesses to understand how each feels.
Material alone doesn’t determine durability. A well-made pick can still bend if twisted, used as a turning tool, or forced against a resistant pin. A thicker pick isn’t automatically the right choice if it can’t move freely in the keyway. Test tools only on locks you own or are authorized to pick, and stop if the shaft deforms.
For standard pin-tumbler practice, compare pick profiles and how they fit your locks before settling on a preferred gauge. Explore the Carbon Fiber Gen 2 Pro Series to choose from a range of profiles for locksport practice. Pair the right fit with light, controlled handling to reduce stress on the pick and keep tactile feedback clear.
Price is worth considering alongside fit and handling, but it doesn’t guarantee suitability. A lock-pick set can cost hundreds of dollars.
If a pin resists, don’t persist with the same pick or apply more force. Pause and reassess the pick’s fit and angle. Use a suitable alternative rather than risking damage to the tool or lock.
Lockpick Pros: Beginner Lockpick Sets
At Lockpick Pros, we offer Beginner Lockpick Sets for building careful locksport habits with suitable tools. Pair a set with our Practice Locks to learn how different keyways and pin feedback feel without risking an in-use lock. As your technique develops, our Advanced Lockpick Sets can support continued practice, while Everyday Carry (EDC) Tools help keep equipment organized for transport.
Choose tools for locks you’re authorized to practice on, and match pick profiles to the keyway instead of forcing a poor fit. The techniques in this guide still apply: a suitable pick needs a light touch, controlled movement, and proper storage. Visit lockpickpros.com to explore our available options.
Make Careful Practice Your Next Step
Make careful tool handling part of your locksport routine. As you practice, note which pick profiles feel controlled in each practice lock, and adjust your setup as your skills grow. This deliberate approach makes avoiding broken lock picks part of your technique, not just a rule to remember when something goes wrong.
At Lockpick Pros, we offer Beginner Lockpick Sets for getting started, Advanced Lockpick Sets for continued skill development, and Practice Locks for hands-on learning. Choose tools that suit your practice and the locks you’re authorized to work on. Progress at your own pace, paying attention to feedback and control.
Ready to choose a pick set for your next stage? Explore the Carbon Fiber Gen 2 Pro Series, or contact Lockpick Pros for help finding a suitable next step. Keep practicing ethically, stay patient, and enjoy each new skill you build.
Frequently Asked Questions
How much pressure should you use when picking a lock?
Use the lightest pressure that lets you feel changes in the lock. A relaxed grip helps you notice pin movement instead of masking feedback with force. If your fingertips tighten or the pick shaft visibly bows, pause and reset your hand. On a practice lock, compare how the pins feel with a gentle touch, then adjust gradually rather than using the same pressure on every lock.
What techniques reduce stress on a lock pick while picking?
Keep the pick aligned with the keyway and use short, controlled strokes. Avoid twisting the handle sideways, which puts bending stress on the shaft. Rest your hand so it stays steady, and guide the tip with your fingers rather than forcing movement with your wrist. On a practice lock, withdraw and reposition the pick if it scrapes or catches instead of pushing through resistance.
How should you tension a lock without damaging picks?
Apply rotational pressure with the tension wrench, not the pick. Position the wrench so it doesn’t crowd the pick’s path, then use your other hand to move the pick independently. If the pick feels trapped while you test a pin, for example, ease pressure on the wrench before changing the pick’s angle. Separating these actions helps prevent the pick from twisting against a loaded plug.
How can you tell when a pick is stuck and avoid snapping it?
A stuck pick may stop moving smoothly, feel wedged against the keyway, or resist withdrawal. Don’t yank or twist the handle. First, stop moving the pick and release pressure from the tension wrench. Then guide the pick back along the same path it entered. If it still won’t move freely, leave it in place and avoid levering against the lock, which can damage the tool or mechanism.