

How to Pick a Lock Without Causing Damage
Picking doesn’t automatically damage a lock, but forceful tools and heavy tension can. Learning how to not damage a lock while picking starts with light, consistent tension, careful pin identification, and stopping when a pick binds instead of forcing it. A gentle touch helps you feel what the pins are doing and lowers the risk of bending a pick or harming the lock.
It’s natural to worry about damaging a lock while you’re learning. The good news is that careful practice can help you build control. This guide explains how tension affects pin movement, how to read feedback, and when to reset instead of pushing harder. You’ll also learn how to practice responsibly on a lock you own or have permission to use.
Key Takeaways
- Picking can harm a lock or tool when force replaces tactile feedback; pause and reset instead of pushing through resistance.
- Use light, steady tension to help distinguish the binding pin from pins that still move freely.
- Choose a pick that fits the keyway, then work slowly and pay attention to subtle clicks and shifts.
- Practice only on locks you own or have permission to pick, and use practice locks to build control.
- Beginner Lockpick Sets and Practice Locks can support careful, step-by-step locksport practice.
Does Picking A Lock Damage The Lock?
Picking can damage a lock if you force the tools or overlook an existing fault. Practice only on a spare lock you own or have permission to use. Check how it works before each session, then compare its condition afterward.
-
Review Professional Picking Practices
Before choosing a method, a locksmith assesses the lock’s condition, keyway, and mechanism, then selects a suitable tool and uses controlled movements. Drilling is a last resort for professional locksmiths, not a shortcut for hobby practice. On your own practice lock, stop if a tool catches or twists, or if it takes force to move.
-
Check for Existing Malfunctions
Test the lock with its key before practice, then check it again afterward. If the key already sticks or the plug feels rough, the lock may have an existing fault. A new problem after forceful contact could be related to the practice session, but don’t assume every fault was caused by picking. Note how the key moves and how much resistance you feel before starting.
- Compare practice-lock designs rather than assuming one model represents them all. A clear practice lock can make internal movement easier to see, while a standard pin-tumbler gives less visual feedback. Keyway shapes, tolerances, pin styles, and combinations all affect how a lock responds. Practice on one authorized model at a time and note what feels different before trying another design.
- Set a patient learning goal instead of treating speed as the measure of progress. Most beginners open a clear practice lock within 15 to 30 minutes; a basic real-world pin tumbler may take one to two weeks of regular practice. Use those timelines as context, not a deadline. A session that ends with a useful observation still builds skill.
- Practice only on locks you own or have permission to use, and follow local laws. Regulations vary across the United States, so ownership alone is not a complete guide to what is permitted. For lubrication, use a product labeled for locks and follow its directions. Lubricate a dry or sluggish lock as directed, not to mask a new problem after picking.
Practicing with different locks helps you understand how their mechanisms affect picking. Focus each session on one authorized lock and pay attention to how your technique feels, rather than expecting one approach to suit every design. If a technique that felt controlled on one lock feels awkward on another, pause and reassess instead of increasing pressure. The goal is to notice differences and make careful choices, not force a result.
Keep a simple record to make comparisons useful. Note which lock you used, how its key moved before practice, what you observed during the session, and whether its operation changed afterward. Separate what you observed from assumptions about the cause. If a new problem develops, stop practicing on that lock rather than treating more attempts as a test of skill. A lock that still works as it did before gives you a clearer basis for comparison. Variety helps most when it supports patient observation and preserves the condition of locks you’re permitted to use.
Applying light, consistent tension
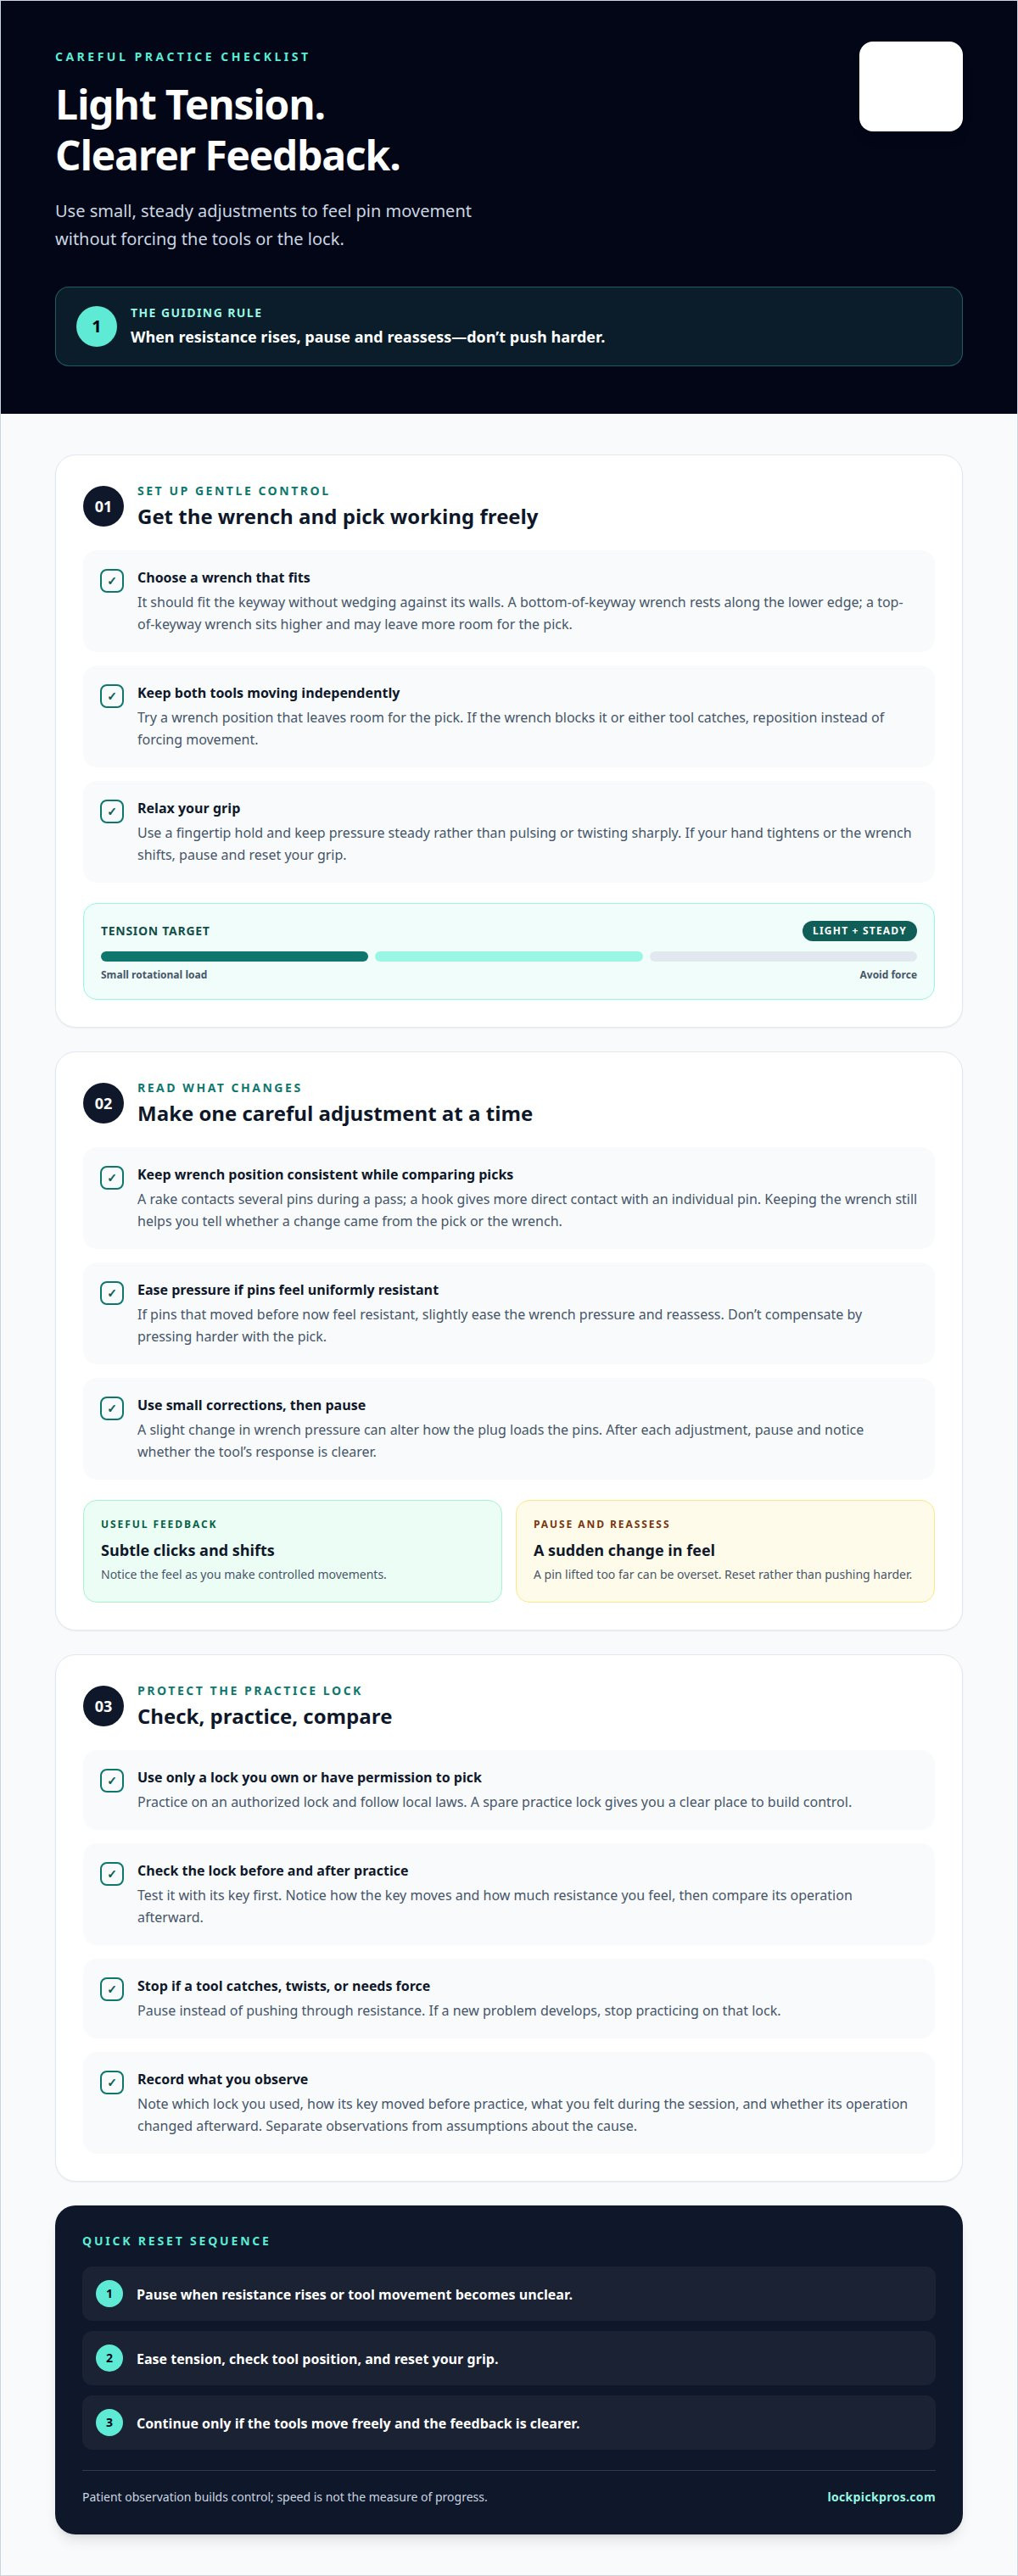
Treat the tension wrench as a sensitive control, not a lever for turning the plug by force. On an authorized practice lock, small adjustments preserve useful feedback as you learn how different tools move inside the keyway.
- Choose a tension wrench that fits the keyway without wedging against its walls. A bottom-of-keyway wrench rests along the lower edge; a top-of-keyway wrench sits higher and may leave more room for the pick. Try the position that lets both tools move independently. If the wrench blocks the pick, reposition it instead of pushing past it.
- Hold the wrench with a relaxed fingertip grip. Keep the pressure steady rather than pulsing or twisting sharply. The goal is to maintain a small amount of rotational load while you read what the pick touches. If your hand tightens or the wrench shifts, pause and reset your grip before continuing.
- On an authorized practice lock, compare a hook with a rake while keeping the wrench in the same position. A rake contacts several pins during a pass; a hook gives more direct contact with an individual pin. Keep the wrench still as you move the pick. This makes it easier to tell whether a change came from the pick or the wrench.
- Notice when tension seems to interfere with pin movement. If pins that moved before now feel uniformly resistant, ease the wrench pressure slightly and reassess. Don’t compensate by pressing harder with the pick. Oversetting happens when a pin is lifted too far, so a sudden change in feel is a reason to pause and reset, not push harder.
- Make small, deliberate corrections instead of large turns. A slight change in wrench pressure can alter how the plug loads the pins; a sudden turn can erase the feedback you were tracking. After each adjustment, pause and notice whether the tool’s response is clearer. Record the wrench position and feel in your practice notes.
- Use a wrench that gives you control without crowding the keyway. Some tension wrenches have different shapes or contact points, which can affect grip and available pick space. Keep the pick and wrench aligned with the keyway, and stop if either tool catches. For standard pin-tumbler practice, compare your grip with a pin-tumbler pick set suited to that practice.
How Do Locksmiths Pick Locks?
Professional locksmiths assess a lock before choosing a non-destructive method. Apply the same deliberate mindset to locksport, and practice only on locks you own or have permission to use.
-
Understand Pin Tumbler Locks
Identify the lock type before choosing tools or setting a practice goal. In a pin-tumbler lock, spring-loaded pin pairs keep the plug from turning until the pins align at the shear line. Keyway shape, tolerances, pin styles, and security features all affect how a lock feels and how difficult it is to pick. Treat an unfamiliar lock as a new learning challenge, not a reason to apply more pressure.
-
Choose Picks for the Lock
Choose a pick that suits the keyway and allows controlled movement. Hooks and reach picks vary in height, depth, and angle; a tool that fits one practice lock may scrape or catch in another. Rakes also come in different shapes and have different uses. If a tool won’t move without force, stop and reassess instead of pushing it into the keyway.
-
Use Force Carefully
Keep your hands relaxed, and stop if a tool bends, twists, or binds. Excessive force can bend or break picks and may damage the lock. Avoid levering a pick against the keyway, forcing a resistant plug, or continuing after a tool catches. These actions can damage a tool or mechanism. A locksmith should reserve drilling for a last resort.
-
Stop if the Keyway Feels Jammed
Stop moving the pick if the keyway suddenly feels blocked or the tool won’t withdraw smoothly. Release pressure and carefully remove the tool without twisting it against the lock. Don’t insert another tool or force the plug. If the keyway remains jammed, leave the lock alone and arrange help from a locksmith rather than risking further damage.
- Choose a reputable locksmith when a lock you need remains stuck or won’t operate normally. Look for a marked vehicle and uniform, and expect an explanation of charges after the locksmith evaluates the situation. Describe what happened and whether the lock was already difficult to use. Those details help the locksmith assess the problem and choose a suitable next step.
Choose tools according to the lock and the practice goal rather than relying on a single pick. Hooks and reach picks vary in height, depth, and angle, helping you reach pins across different combinations. Keyways, tolerances, pin styles, and combinations vary between locks and affect how they feel and how difficult they are to pick.
If raking doesn’t work, release tension and reset the lock. You may need more than one reset. Slow down and notice subtle clicks and shifts, which can tell you whether a pin has set or needs more manipulation. If progress is unclear, pay attention to those small changes instead of increasing force, which can bend or break tools and damage the lock.
Identifying the binding pin
In a pin-tumbler lock, a binding pin is a pin pair held under pressure where the plug contacts the lock body. Learn the concept on an authorized practice lock, where you can explore feedback without risking a lock you depend on.
- Use a dedicated practice lock and keep its key nearby. A transparent or cutaway model can show how pin pairs relate to the plug, while a standard practice lock provides less visual feedback. Work only with hardware you own or have permission to use. Don’t try this on an installed door lock, vehicle, or lock protecting property.
- Learn to distinguish spring movement from restricted movement. A freely moving pin responds to light contact; a binding pin is held by pressure within the mechanism. Understanding the difference doesn’t mean you should push harder. If the lock or tool resists, stop rather than forcing it.
- Keep a simple record for each practice session. Note the lock type, whether the feedback felt springy or restricted, and whether it changed after you reset the practice lock. For example, compare the same model before and after a reset. Brief notes help distinguish repeatable feedback from an accidental scrape or a change in grip.
- Change only one practice condition at a time. If you change locks, picks, and hand position together, you won’t know which change affected the feel. Use the same authorized practice lock and a familiar tool while learning its feedback. Don’t use a working door lock as a test object, since a jam could affect access.
- Avoid jumping to conclusions. A rough keyway, worn component, or unsuitable tool can feel like resistance, but that sensation alone doesn’t prove a pin is binding. Compare the lock’s behavior with its known starting condition. Stop if the feedback becomes newly rough, the tool catches, or the lock no longer works normally with its key.
- Reset safely when the feedback becomes unclear. Withdraw tools without twisting them against the keyway, release any pressure, and test the practice lock with its key. If it’s still difficult to operate, set it aside rather than continuing. Use another practice lock for future learning, and keep locks that secure property out of your experiments.
Beginner lock-picking steps
Build beginner skills on a practice lock you own or have permission to use. Learning how to not damage a lock while picking starts with a calm routine, careful observation, and a clear point at which to stop.
- Choose a dedicated practice lock and keep its key nearby. A clear practice lock can help connect visible movement with tactile feedback, while a standard pin-tumbler offers less visual information. Keep household, vehicle, and workplace locks out of practice so learning doesn’t interfere with access or security.
- Record the lock’s starting condition before each session. Test it with its key and note whether the key turns smoothly, the plug feels rough, or the mechanism sticks. This baseline helps you spot changes later. If the lock already behaves inconsistently, set it aside rather than using it as a reliable training example.
- Set one learning goal for each session. For example, focus on distinguishing springy movement from restricted movement rather than switching between tools or methods. A narrow goal makes your notes more useful and helps you notice when fatigue or a changed grip affects what you feel.
- Keep a practice log for each attempt. Record the lock type, tool used, feedback you noticed, and whether the lock’s behavior changed afterward. Don’t record only whether it opened. A note such as “the key turned smoothly before practice” gives you a useful comparison for your next session.
- Practice patiently, without treating a time estimate as a target. Most beginners open a clear practice lock within 15 to 30 minutes, while a basic real-world pin tumbler may take one to two weeks of regular practice. Stop if your hands tire or the mechanism starts feeling different.
- Change one practice variable at a time. After learning on a clear model, try another authorized practice lock and compare its feedback. Keyway shape, pin styles, and tolerances affect how locks feel. A routine for how to not damage a lock while picking depends on noticing those differences, not assuming one method suits every model.
- Finish by testing the practice lock with its key and comparing it with your starting notes. This final check helps you catch new resistance early, an important habit for how to not damage a lock while picking. If the key catches or the mechanism feels rough, stop using that lock instead of forcing it.
- When you’re ready to continue practicing standard pin-tumbler locks, explore a pin-tumbler practice pick set as a next step in your locksport routine.
Lockpick Pros: Beginner Lockpick Sets
We offer Beginner Lockpick Sets and Practice Locks for people ready to build careful locksport habits. A beginner set provides tools for practicing controlled movement, while a dedicated practice lock lets you learn without experimenting on a lock you rely on for everyday access.
Choose equipment that matches your skill level, then focus on recognizing feedback and stopping when a tool catches or resistance changes. As your experience grows, our Advanced Lockpick Sets and Everyday Carry (EDC) Tools can support different stages of your hobby. Use tools only on locks you own or have permission to pick.
Explore ethical practice gear and find a starting point for your locksport journey at lockpickpros.com.
Keep Building Your Locksport Skill
Take one clear lesson from each practice session. Record what you noticed, what changed, and when you chose to stop. Over time, those notes can help you recognize your habits and practice more deliberately. Knowing how to not damage a lock while picking isn’t about rushing to turn the plug. It’s about respecting the equipment, learning from feedback, and keeping practice ethical.
As your confidence grows, choose practice challenges that match your developing control. A new tool should support thoughtful learning, not replace it. If you’re ready to continue with standard pin-tumbler practice, explore the Carbon Fiber Gen 2 Pro Series as a possible next step. Keep working only with locks you own or have permission to pick, and let patience guide your progress. Every careful session is a chance to sharpen your skills.
Frequently Asked Questions
What tools are safest for practicing lock picking without damaging a lock?
Use a purpose-made practice lock, its matching key, properly fitting picks, and a tension wrench. A clear or cutaway model can help you observe the mechanism without risking a lock used for daily access. Keep tools straight and use them only on locks you own or have permission to practice on. Stop if a pick catches or bends, or if the lock’s behavior changes.
How can I tell whether a lock is suitable for non-destructive picking practice?
Choose a spare practice lock that works normally with its key and doesn’t secure a door, vehicle, or personal property. Check its starting condition so you don’t mistake a pre-existing fault for practice damage. A dedicated practice model is a better choice than a lock you rely on. Always check your local laws before purchasing or carrying tools in public.
What are the basic steps for picking a standard pin tumbler lock without damaging it?
For safe practice, start with a lock you own or have permission to use, and confirm that it works with its key. Use tools suited to the practice lock, keep movements controlled, and pay attention to changes in resistance. Don’t force a stuck tool or plug. Stop if the pick bends, the keyway feels jammed, or the lock operates differently afterward.
How much tension should I apply when picking a lock?
Apply light, steady tension and adjust it gently in response to the lock’s feedback. If all pins feel springy, the tension may be too light to hold a pin in place. If several feel difficult to move, the pressure may be too strong. Don’t use the same force on every lock. Stop and reset if you can’t clearly distinguish pin movement.
Can lock picking bend or break picks or damage pins and springs?
Yes. Excessive force can bend or break a pick and may damage lock components, including pins or springs. A pick that twists, bows, or catches is a signal to stop, not push harder. Withdraw it carefully without levering it against the keyway. If the lock feels rough afterward or no longer works normally with its key, stop practicing with it.