

How to Use a Pinning Tray: Gutting and Rekeying Guide
You finally heard that satisfying click and the plug turned, but now the real challenge begins. You're ready to gut your lock for a belt ranking video, but as you pull the core, a tiny driver pin launches across the room and vanishes into the carpet. It's a nightmare every ethical lockpicker fears. Learning how to use a pinning tray is the difference between a successful reassembly and a bricked lock that ends up in the scrap bin.
We've all felt that spike of anxiety when those microscopic springs and pins start rolling around the workbench. It's easy to lose track of the order, especially when you're dealing with serrated pins or spool pins that require extra care. This guide will show you the professional way to organize your workspace to master lock gutting without losing a single part. We'll walk through the specific layout of the Ultimate Pinning Tray, explain how to align your components for a perfect rekeying job, and provide the step by step workflow used by experts to ensure every lock goes back together better than it started.
Key Takeaways
- Discover why a pinning tray is an essential bridge between picking a lock and mastering its internal mechanics.
- Learn exactly how to use a pinning tray to organize your components so you never lose a microscopic spring again.
- Master the professional workflow for using plug followers to avoid "spring launches" and protect your practice hardware.
- Find out how proper workbench setup and lighting help you identify complex security pins like serrated or spool pins.
- Understand how organizing your workspace with tools like the Ultimate Pinning Tray helps you climb the belt ranking system faster.
What is a Pinning Tray and Why is it Essential?
If you've ever tried to take apart a lock on a flat table, you know the instant panic that sets in when a tiny brass pin starts rolling toward the edge of your desk. A pinning tray is a specialized organizer designed to keep every microscopic component of a lock exactly where it belongs. It's more than just a storage dish; it's a critical piece of gear for any ethical lockpicker moving past basic picking and into the world of lock gutting and rekeying.
As you progress through the belt ranking system, you'll find that many levels require a filmed "gut and reassemble" to prove your mastery. Learning how to use a pinning tray early in your journey makes these milestones much less stressful. These trays allow you to study security pins in a controlled environment, helping you understand the internal mechanics that create the tactile feedback you feel through your Carbon Fiber Gen 2 Pro Series picks.
Defining the Pinning Tray for Beginners
Think of the tray as a physical map of the lock core. Beginners often try to use improvised solutions like egg cartons or magnetic mats, but these lack the precision needed for tiny springs and serrated pins. Professional trays are typically made from 3D-printed plastic, milled aluminum, or heavy-duty silicone. A dedicated tray ensures that as you pull the plug, you have a specific, numbered slot for every chamber. This preserves the bitting order, which is vital if you want the lock to actually function once you put it back together. Without a tray, a single sneeze can turn a high-quality practice lock into a pile of useless scrap metal.
Anatomy of the Ultimate Pinning Tray
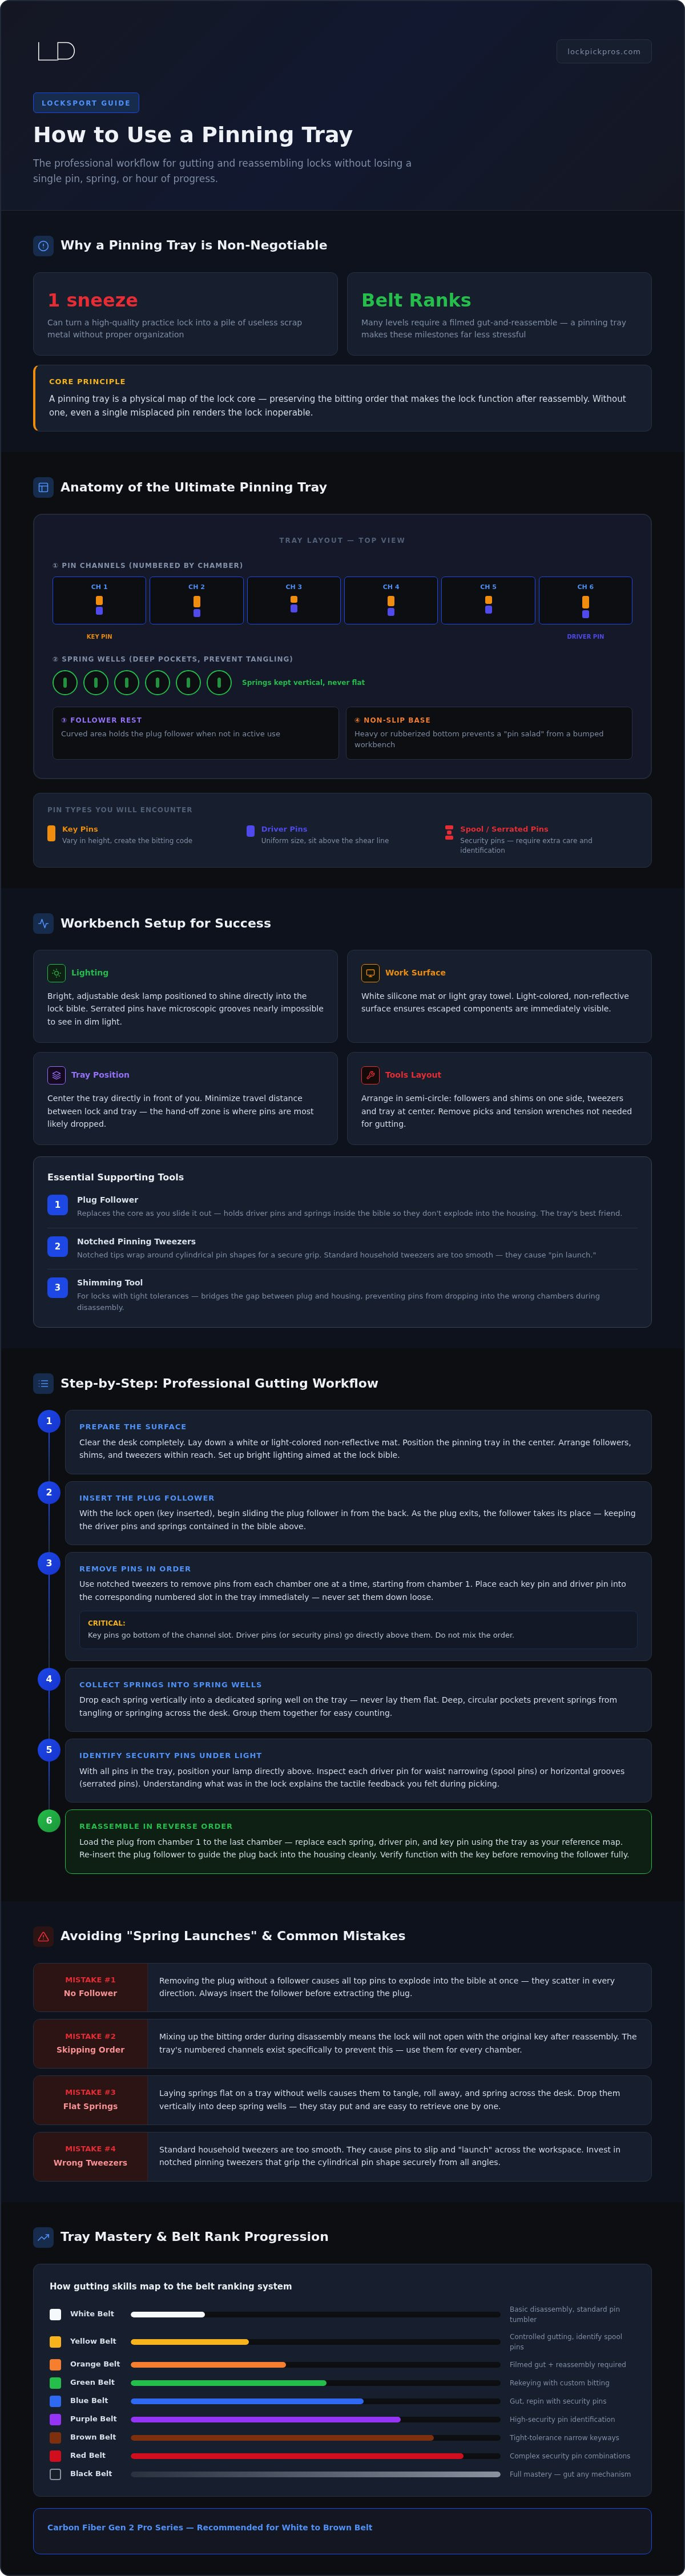
The layout of a professional tray is highly intentional. Most designs, such as the Ultimate Pinning Tray, feature distinct rows and compartments:
- Pin Channels: These long, narrow grooves hold the key pins and driver pins in the exact order they came out of the lock.
- Spring Wells: Deep, circular pockets are reserved for the springs. These wells are deep enough to prevent a spring from "jumping" or tangling with other parts.
- Follower Rest: Many trays include a curved area to hold your plug follower when it's not in use.
- Non-Slip Base: A heavy or rubberized bottom is essential. It ensures that a bump to your workbench doesn't result in a "pin salad" that destroys hours of progress.
Understanding how to use a pinning tray correctly means you can focus on the skill of gutting rather than the fear of losing parts. It creates a professional, organized workspace that reflects your dedication to the craft of locksport.
Setting Up Your Workbench for Success
Preparation is the secret weapon of every expert in the locksport community. Before you even touch a follower, you need a workspace that supports precision. A cluttered desk is an invitation for disaster. Start by clearing your area and laying down a light-colored, non-reflective surface. A white silicone mat or a simple light gray towel works best. This ensures that if a tiny component escapes your grip, it won't bounce away or blend into the background.
Lighting is your next priority. Security pins, especially serrated pins, have microscopic grooves that are nearly impossible to see in dim light. Use a bright, adjustable desk lamp positioned to shine directly into the lock bible. This visibility is crucial for understanding how to use a pinning tray effectively, as it allows you to spot the orientation of every pin before you place it in the tray.
Ergonomics play a huge role in your success. Position your tray directly in front of you, centered in your workspace. You want to minimize the travel distance between the lock and the tray. This reduces the "hand-off" time where a pin is most likely to be dropped. Keep your tools arranged in a semi-circle around the tray for easy access without reaching over your delicate parts.
Essential Tools to Pair with Your Tray
A pinning tray is the heart of your setup, but it needs the right supporting cast. Standard household tweezers won't cut it here. You need specialized pinning tweezers with notched tips. These are designed to wrap around the cylindrical shape of the pins, giving you a secure grip that prevents "pin launch."
The plug follower is the tray's best friend. It takes the place of the core as you slide it out, holding the driver pins and springs inside the bible. Without a follower, your top pins will explode into the housing. For locks with tight tolerances, a shimming tool is also vital. It slides between the plug and the housing to bridge the gap, preventing pins from dropping into the wrong chambers during disassembly.
Organizing for Efficiency
Arrange your tools in the order you'll use them. Your followers and shims should be on one side, with your tweezers and tray in the center. Clear away any picks or tension wrenches that aren't part of the gutting process to avoid distractions. If you're feeling rusty, take a moment to ensure your lock rekeying for beginners knowledge is fresh before you begin.
Once your workspace is ready and the lock is reassembled, you can verify your work by testing the feedback with a high-quality pick from the Carbon Fiber Gen 2 Pro Series. A clean setup ensures your focus stays on the mechanics, not on hunting for lost parts.
Step-by-Step: How to Use a Pinning Tray for Gutting
Once the plug turns, the real education begins. To start the gutting process, unlock the core using your key or your picked state. Rotate the plug about 45 degrees to ensure the pins don't drop into the bottom of the keyway. Insert your plug follower from the back of the lock, keeping it flush against the core. Push the core forward through the housing while maintaining constant pressure on the follower. This keeps the driver pins and springs trapped safely in the bible while the core is removed.
Mastering how to use a pinning tray is about developing a repeatable rhythm. With the core removed, you can now dump the key pins into the tray. Do this one at a time. Use your pinning tweezers to lift each pin and place it in its designated slot. After the core is empty, turn your attention to the housing. Carefully pull back the follower just enough to release the first driver pin and spring. Repeat this for every chamber, moving from the front of the lock to the back.
Mapping the Core to the Tray
Organization is the only thing standing between a working lock and a bag of spare parts. Your tray is designed to mirror the internal layout of the lock. Follow this specific mapping strategy for every gutting job:
- First Row: Place your key pins here. Start with the pin from the front of the lock (the one closest to you) in the first slot and work your way back.
- Second Row: Align your driver pins directly behind their corresponding key pins. This visual alignment helps you understand the stack height and shear line relationship.
- Spring Wells: Drop each spring into the deep wells provided. This prevents them from tangling or rolling into the pin channels.
Handling Security Pins Safely
Security pins are the highlight of any gutting session. Pay close attention to the orientation of a Spool pin as you remove it. Seeing the narrowed waist helps you visualize why the core rotates slightly when the pin catches on the shear line during picking. Similarly, keep your serrated pins in their own slots. Mixing them with standard drivers will change the picking feedback and could even make the lock behave unpredictably during your next practice session. By keeping every component in its original chamber slot, the tray preserves the bitting order and ensures your key still operates the lock perfectly.
Avoiding Common Mistakes and "Spring Launches"
The "spring launch" is the most common rite of passage in locksport. It happens the moment your plug follower slips just a fraction of a millimeter, allowing the spring tension to fire a driver pin into the unknown. If you've spent thirty minutes picking a challenging lock, the last thing you want is for a tiny brass component to become a permanent resident of your carpet. Mastering how to use a pinning tray involves more than just layout; it requires strict procedural discipline to avoid these catastrophic resets.
One fatal mistake beginners make is turning the core 180 degrees without a follower in place. In this position, the driver pins and springs can drop directly into the bottom of the keyway. This effectively bricks the lock, as the springs get crushed or tangled in the warding. Always keep your follower flush against the core. Discipline at the tray means never mixing pins from different chambers. If you get distracted and drop two pins into the same slot, you've lost the bitting order, and your key may no longer work. Always double-check the tray layout before you begin the reassembly process.
The Most Common Pinning Errors
Even with a tray, errors happen. Over-setting a pin during reassembly is a classic trap. If a key pin is too long for its chamber, it can trap the driver pin above the shear line, making the lock impossible to open. This is why you must double-check every slot in your tray before the core goes back in. Putting a spring in the wrong chamber can also cause a jam, especially if the lock uses varying spring tensions. Additionally, using the wrong size plug follower creates a gap where a pin can snag. A follower should fit the diameter of the core perfectly to ensure a smooth transition.
Recovering from a Dropped Pin
If you do drop a pin, don't panic. Use a bright flashlight at a low angle across the floor. This creates a long shadow that makes the pin easier to see. A strong magnet can also help. While most pins are brass and won't react, many springs are steel and will jump right to the magnet. The ethical code of locksport is clear: we never leave a lock in a broken state. Whether you are practice gutting for fun or meeting the lock picking belt levels explained requirements, your goal is a functional reassembly.
Once you've mastered the discipline of the tray, you can test your reassembled locks with the precision of the Carbon Fiber Gen 2 Pro Series to ensure every pin is hitting the shear line exactly as intended. Knowing how to use a pinning tray correctly transforms a stressful gutting session into a repeatable, professional process.
Advancing Your Skills with Professional Gear
Mastering how to use a pinning tray is a major milestone in any lockpicker's journey. It marks your transition from someone who simply picks locks to someone who truly understands the internal mechanics. High-level locksport requires you to take apart your successes to prove your skill for higher belt rankings. This level of organization is the hallmark of a dedicated, ethical lockpicker who respects the craft. When you can gut a lock and reassemble it with confidence, you've reached a new tier of the hobby.
As you face more complex security pins, the margin for error shrinks. Precision trays are non-negotiable when you're dealing with the tight tolerances found in advanced practice hardware. Once you've rekeyed a lock to a custom bitting, you need tools that can communicate exactly how those pins are interacting with the shear line. A professional tray ensures that your focus remains on the feedback of the lock rather than the location of its parts. It creates a repeatable process that builds the muscle memory needed for expert-level work.
Upgrading to the Carbon Fiber Gen 2 Pro Series
After you've spent time at the pinning tray, you'll want to test your work with the best tools available. High-yield stainless steel is vital for navigating narrow keyways without pick-warp. The real advantage lies in our carbon fiber handles. These handles transmit vibrations from the pins directly to the picker, providing the high-level feedback needed to feel every serration. This tactile response is essential when you're trying to determine if a spool pin is truly set or just caught in a false set. Upgrade your kit with the Carbon Fiber Gen 2 Pro Series to experience the precision that professionals demand.
Joining the Black Belt Challenge
Your progress shouldn't happen in a vacuum. Join over 10,000 ethical hobbyists in our growing community who share your passion for precision. The Black Belt Challenge is designed to reward your dedication through every step of the belt ranking system. By sharing your gutting progress and showing off your organized pinning tray on social media, you can earn reward picks. This share-to-earn loop feeds the community and helps everyone improve their skills together. The journey from White Belt to the $5,000 community bounty is about constant skill refinement and community support.
Every lock you gut and reassemble brings you one step closer to mastery. We believe in rewarding your dedication to ethical locksport. We provide the precision tools and community-vetted gear to support your journey at every level. Your pinning tray is the foundation, but your picks are your voice inside the lock. Join the Black Belt Challenge and start your journey today!
Master Your Journey to Lock Mastery
Transitioning from picking to gutting is a major leap in your locksport journey. By learning how to use a pinning tray, you've gained the organizational skills needed to tackle advanced security pins without the fear of a "spring launch." You now understand that a clean workspace and a precise physical map of the core are the secrets to a successful, functional reassembly every time.
It's time to put that knowledge into action and start earning your next belt. Join over 10,000 ethical lockpickers in our community challenge and push your skills to the limit. We're here to support your growth with a lifetime warranty on our precision gear and fast 24-hour shipping from the USA so you never have to wait to start your next project. Master your next belt rank with the Carbon Fiber Gen 2 Pro Series and experience the elite feedback that only real carbon fiber can provide. Keep practicing, stay ethical, and enjoy the satisfaction of a perfectly rekeyed lock!
Frequently Asked Questions
Do I really need a pinning tray to gut a lock?
You don't strictly need a pinning tray to gut a lock, but you'll almost certainly regret not having one. While some pickers use a folded towel or an egg carton, these improvised methods lack the deep wells and numbered channels of professional gear. A dedicated tray keeps your pins in order and prevents them from rolling off the table. Learning how to use a pinning tray is the best way to ensure your lock actually works after you put it back together.
What is the best material for a pinning tray?
The best material for a pinning tray depends on your workspace needs. Silicone trays are popular because they're naturally non-slip and have a soft surface that prevents pins from bouncing. Milled aluminum trays offer a professional weight and durability that lasts a lifetime. Some hobbyists use 3D-printed plastic trays, which are functional but can be lightweight. We recommend a tray with a heavy base to keep your components secure during complex gutting sessions.
How do I keep my springs from jumping out of the pinning tray?
Keeping springs secure starts with using a tray that features deep, dedicated spring wells. When you learn how to use a pinning tray, you'll see that these circular pockets are designed to trap the spring tension. Always use pinning tweezers to place the spring directly into the bottom of the well. Avoid overcrowding slots, as a tangled spring is more likely to catch and launch when you try to retrieve it later.
Can I use a pinning tray for rekeying my home locks?
Yes, a pinning tray is an excellent tool for rekeying your own residential locks. Whether you're changing the bitting for security or just practicing your skills, the tray keeps the cylinder components organized. Just remember our ethical code: only use your tools on locks you own or have explicit permission to work on. For home projects, a tray ensures you don't leave your front door in a broken state due to a lost pin.
What other tools do I need besides a pinning tray?
A pinning tray is just one part of a professional gutting setup. You'll also need specialized pinning tweezers with notched tips to grip the pins securely. A set of plug followers is essential to hold the driver pins in the bible while the core is removed. For locks with tight tolerances, keep a few shims on hand to prevent the pins from snagging. These tools work together to create a smooth, controlled disassembly process.
How do I clean a pinning tray after a messy gutting job?
Cleaning your tray is simple but important for maintaining a professional workspace. For silicone or plastic trays, a quick wash with warm, soapy water will remove any old lock lubricant or metal shavings. If you're using a milled aluminum tray, a wipe-down with a small amount of isopropyl alcohol works perfectly. Always dry the tray completely before your next session to prevent any moisture from causing corrosion on your brass pins or steel springs.
Is a pinning tray required for the Green Belt rank?
While the community rules don't explicitly list a pinning tray as a required purchase, it is practically necessary for the Green Belt rank and above. These levels require you to film yourself gutting and reassembling a lock on camera. Without a clear way to show the pins and springs in order, it's very difficult to verify your work. Using a tray shows the community that you are an organized and serious ethical lockpicker.